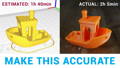
The estimated printing time is inaccurate?
Have you ever encountered a situation where the estimated print time for a 3D Benchy model in the slicing software is 1 hour and 40 minutes, but the actual print time is 2 hours and 5 minutes? This article helps us understand the reasons for this and how to improve it.
Subscribe
Join our mailing list and never miss the latest updates on 3D printing knowledge and BeagleCam new features!
"After 250 hours of research and testing, including interviewing five baby wearing experts and walking over 100 miles in 15 wraps, slings, and meh dais, we think that the Gemlak Baby Carriers is the best"
Lily
About Mintion
Mintion was founded by some 3D printing enthusiasts and committed to providing simple, easy-to-use, and affordable products for customers; our mission is to make 3D printing more accessible and enjoy more fun.
Mintion Beagle camera is a dual-use 3d printer camera that allows you to monitor and control your 3D printer remotely, while also making it easy to create time-lapse videos.
Most Popular

Update Date: 2023-1-16
Trending Articles


How does slicing software calculate the Estimated printing time?
- Total print time = Start Gcode + [Model layers * (per-layer printing time + layer change time)] + End Gcode
- The Start Gcode process can generally be divided into zeroing and heating stages. The zeroing stage usually includes G28 and G29,
- The heating stage refers to the period when the hot end and the heated bed reach the target temperature from the current temperature. This phase also produces some time errors due to different target temperatures, environmental temperatures, and PID parameter settings.
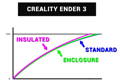
Image Source:Teching Tech
- Model layers * (per-layer printing time + layer change time): For slicing software, the model is sliced into many layers (based on the layer height you set), and each layer is divided into inner wall, outer wall, and infill sections in 3D printing slicing software. These sections may appear in the Gcode file as "; TYPE: SKIRT," "; TYPE: WALL-OUTER," "; TYPE: WALL-INNER," and "; TYPE: Infill". Different printing sections have different speeds. For example, the outer wall seeks printing quality and may have a slower speed than the interior.
- Of course, the starting points between different printing sections may also differ, resulting in movement time. Similarly, there may be starting and ending points that are not in the same position for the layer and layer change time. These rapid movements (usually referred to as "travel speed" or the speed at which the printer moves without extruding filament) and different printing sections (interior, exterior, infill) are usually represented


Image Source:Teching Tech
- In the Gcode file as F3000, where F stands for "feed rate" and indicates the printer's movement speed per minute. F3000 means the printer moves a distance of 3000 millimeters per minute. The unit of F is millimeters per minute.
- End Gcode usually involves some motor movements (such as raising the hot end, zeroing, moving the heated bed to the front, etc.), turning off the fan, turning off the heat, playing sounds, etc. The movements may take some different time depending on different positions and feed rates.

Image Source:Teching Tech
- Based on the above situation, it can be seen that all three stages involve printer movement, with the "model layer * (layer print time + layer change time)" stage involving a lot of movement and E-motor extrusion. As we all know, distance = time * speed,
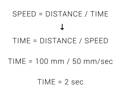
Image Source:Teching Tech
- In fact, during printer movement, the speed does not immediately reach the set speed. For example, F3000 (which is 60mm/s), this speed is not achieved all at once, and it involves an acceleration process (this link expresses this process very well). You will see that in the distance that the nozzle/bed moves during a certain time, there is an acceleration phase, a constant speed phase, and a deceleration phase.

Image Source:Prusa
- Of course, in a certain distance, the speed change process may have an initial speed that is not zero and a final speed that is not zero,involving jerk parameters, which is the acceleration change rate when the print head changes direction during printing. In 3D printing, shaking affects print quality and print speed. Adjusting the printer's jerk parameters can reduce shaking and improve print quality and speed. This is a complex process.
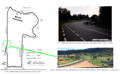
Image Source:Teching Tech
What are the possible reasons for the deviation between the Estimated printing time and the actual printing time?
- The heating stage, this phase also produces some time errors due to different target temperatures, environmental temperatures, and PID parameter settings.
- The time required to execute G28 during the bed leveling stage depends on different feed rates, accelerations, nozzle and bed positions. The time difference can be significant and may be caused by automatic bed leveling (G29). For printers with different bed sizes and probing points, the automatic bed leveling process may take several minutes. For example, the Prusa I3 MK3S+ can complete bed leveling in just a few minutes, while the AnyCubic Vyper may take almost 10 minutes, and the Creality CR-10 smart may take 10-20 minutes. -- Estimated time is for reference only.
- Extrusion process/movement, this is also the main reason why the time estimate is incorrect. Due to the difference between the actual acceleration and jerk parameters of the printer and those used in the slicer software, the accumulated time error in distance leads to an inaccurate estimated time for the entire print part (this is more inaccurate for larger and more complex models).
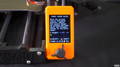
- Micro SD card read and write speeds are represented as "Class" or "Speed Class". For example, a card with a speed class of 10 indicates that its minimum write speed is 10MB/s. If your Micro SD card read and write speed is not fast enough, you may notice some pauses when the printer nozzle or bed is printing, which also affects the final estimated print time.

Image Source:Teching Tech
- Board hardware limitations, there is a parameter "model resolution" in the slicing software. The higher the resolution, the larger the model details, but it also requires a higher processing speed of the printer's main board. When it exceeds the processing speed supported by the board hardware, you may also see situations like the above-mentioned nozzle and bed pauses.

Image Source:PrusaSlicer
- Special commands can also affect the time estimation, some G-code commands, such as G10/G11, call the printer configuration file parameters for retraction or extrusion. This part of the content, the slicing software is not clear about your printer settings, so it may also cause some time errors.
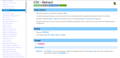
Image Source:Marlin
- The Beagle Camera's delayed shooting mode can also cause some time errors, as taking pictures with the camera takes some time, and the printer will pause. This setting depends on the different delay shooting modes and the number of layers shot, ultimately resulting in different effects.
- Clean TimeLapse video also produces a displacement, such as the nozzle moving to one side, the bed moving to a certain position, so there will be different displacements at different positions, and the final time spent will be different.

Image Source:BeagleCamera
How to optimize the estimated printing time?
- The above are common factors that lead to inaccurate print time estimates. So how can we solve this problem? From the above content, it is not difficult to see that the biggest problem is that the slicing software does not know the printer's configuration (acceleration, maximum acceleration setting), so we can obtain the printer configuration information and enter it into the slicing software to finally get a more accurate print time estimate.

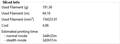
Image Source:PrusaSlicer
How to obtain printer configuration information?
- Through the printer's knob screen or touch screen, find "Settings" and then find parameters such as "Max feedrates," "Max accelerations," and "Max jerk limits."

Image Source:Teching Tech
- Connect to the computer via a serial port and use serial port software (such as Pronterface) to send "M503" to obtain them.

Image Source:Pronterface
How to modify them in slicing software?
- Simplify3D There is no such feature in V4.x, and I have not found any relevant information for V5.x at the moment.
- PrusaSlicer You can find "Machine limits" and modify "How to apply limits" to the "Use for time estimate" mode, and then modify the corresponding parameters such as "Max feedrates," "Max accelerations," and "Max jerk limits."

Image Source:PrusaSlicer
- SuperSlicer Similar to PrusaSlicer, modify "How to apply limits" to the "Use for time estimate" mode and then modify the corresponding parameters such as "Max feedrates," "Max accelerations," and "Max jerk limits." One difference is that you can see a "Time estimation compensation" parameter, which you can modify based on the ratio of theoretical estimated time and actual print time to obtain a more accurate print time estimate.

Image Source:Teching Tech
- Cura After loading the Printer Setting plugin in "Manage packages," find "Printer settings" and modify the corresponding parameters such as "Max feedrates," "Max accelerations," and "Max jerk limits."

Image Source:Teching Tech
- Of course, you can also apply the acceleration settings in the slicing software to the printer, which is feasible. However, you need to pay attention to the maximum acceleration settings of the printer, as the machine itself may have a maximum speed limit (setting a maximum acceleration in the slicing software that exceeds the machine's maximum limit, and the machine will execute according to the maximum acceleration limit in the machine configuration).
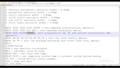
Image Source:Teching Tech
- Simplify3D Add instructions such as "M201" in the "Start Gcode," for more information, you can visit Marlin (.

Image Source:Simplify3d
- PrusaSlicer You can find "Machine limits" and modify "How to apply limits" to the "Emit to G-code" mode, and define the corresponding parameters such as "Max feedrates," "Max accelerations," and "Max jerk limits."

Image Source:PrusaSlicer
- SuperSlicer Select the "Also emit limits to G-code" mode, and then define the corresponding parameters such as "Max feedrates," "Max accelerations," and "Max jerk limits."

Image Source:Teching Tech
- Cura Enter the acceleration and jerk parameters in the input field for search, and then modify them.


Image Source:Teching Tech
Sum-up
- In short, the inaccuracy of print time estimates is mainly affected by inconsistent acceleration and jerk parameters. You can modify the relevant parameters in the slicing software, or apply them in the print job (but be aware that setting beyond the printer's maximum limit may also cause time estimation problems).
- If there is any inaccurate or updated information in the article, please let me know.