Update: 2022-10-25
I ran into this problem while drawing the BeagleCamera Tripod Threaded Adapter. Of course, for the M4 thread and UNC1/4 thread, you may think that print one is fine, but we need to increase the friction in case the camera would fall, as the adapter is connected to the bracket at one end and the Camera at the other end. So metal threads will be much more reliable. When I started to understand how to improve it, I found the solution of "HEAT-SET INSERTS" and "Embedding Nuts".
Let's take a quick look at the problems encountered with the above two solutions and the final adapter.
HEAT-SET INSERTS
What‘s this?
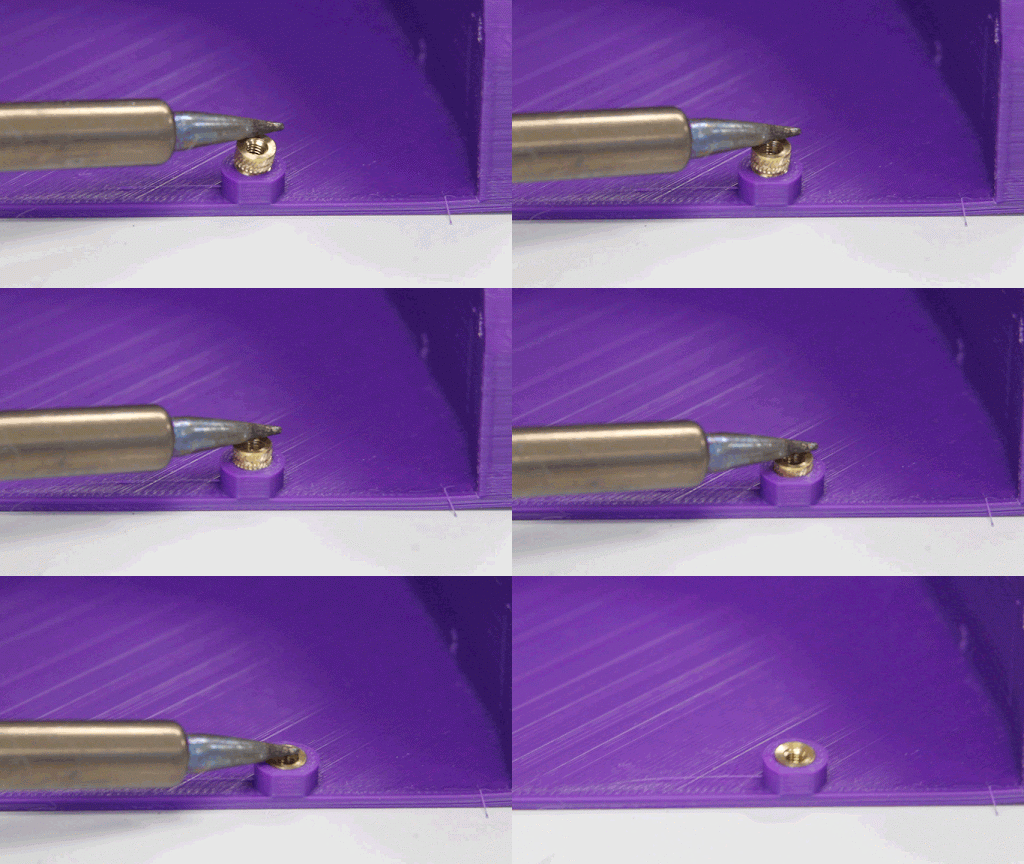
HEAT-SET INSERTS is a part that adds threads to thermoplastic materials and then extrudes the filament through the nozzle in the 3D printer. The parts printed by fusion deposition are all thermoplastic materials. This is undoubtedly very suitable for 3D-printed parts, of course, there are certain design restrictions. For example, it is required to have limited pull-out strength on one end face.
Operation Steps
Heat the HEAT-SET INSERTS with a soldering iron, then press it into the print; wait for it to cool, then add the HEAT-SET INSERTS.
Where to get it?

Embedding Nuts

What‘s this?
It is a way to put a square or hexagonal nut into the print, the print will be very neat, and at the same time, the nut is wrapped by the print, providing high thread connection strength.
Operation Steps
Insert the pause command M300 or M600 in the print file, pause at the specified height, and wait, which gives you time and possibility to put in the nut, so as to get a print with hidden nuts after the printing is completed.
Where to get it?
Insert the pause command M300 or M600 in the print file, pause at the specified height, and wait, which gives you time and possibility to put in the nut, so as to get a print with hidden nuts after the printing is completed.
CAPTIVE NUTS AND MORE IN 3D PRINTING By theGHIZmo
Tell "How to Design and Print", including nut placement orientation.
Embedding Nuts in 3D Printed Parts for Hidden Fastener Strength By Markforged
Tell the theoretical basics and how to design and print. At the end it mentioned about the printing a "triangular piece", filling in the gaps and adding more placement freedom.
Finally, if you have problems with how to insert the pause command, you can refer to my solution on PrusaSlicer 2.4.2. In the slice preview window, select the height, click the "+" next to it, re-slice, and you will get a Gcode file paused at the specified height.
BeagleCamera Tripod Threaded Connection Adapter
What‘s this?
This is the connector for connecting the Camera and the tripod. The tripod is connected by UNC 1/4, and the Camera base is connected by M4 x10 countersunk head screws.
Operation Steps
2. When the printer stops on one side, put in the nut (Prusa I3 MK3S+ will make a sound while waiting for the filament to be replaced).
3. Check the state of the nut, this is very important, if it is higher than the height of the printed model, the nozzle may collide.
4. Replace the filament according to the printer screen, then resume printing.
Where to get it?

In Conclusion
In conclusion, the Beaglecamera adapter has gone through 3 versions. In order to solve the problem of relative sliding between the adapter and the camera base, a triangular piece was added. Then due to the loss of EVA pad, the anti-skid effect was not good, and then modified to add a circular EVA pad version; finally, when printing in batches, after putting in nuts One layer, the circular inner contour could not adhere to the metal screw, resulting in the failure of printing (layer offset, excess filament caused the model to have a part higher than the current printing height), the final version is closed UNC 1/4 screw top surface, Then insert the two M4 screws from the other direction instead.
Welcome to discuss with us and let 3d printing is more fun. If there's any question or need assistance from us, please feel free to contact us at support@mintion.net.
