Update: 14/10/2022
The main idea
Do you want to present a beautiful time-lapse video, but are troubled by artifacts including blobs, zits, stringing, etc?
This article will tell how we struggled with it and what you can do to improve the printing quality.
PS: The article is for Beagle Camera firmware V1.1.2 and V1.1.2+ since this version added XY position, Z axis elevation, and other debuggable parameters.
We collected a lot of data and ran a series of tests on the cause of the problem. The preliminary conclusion is that when the nozzle moves to one side to take pictures, some filament will flow out of the nozzle. Then after the nozzle returns to the model, the excess filament adheres to the model's surface.
At first, we speculated that the excess filament flowing out of the nozzle was due to gravity, and we tried tilting the printer at an angle or even turning the printer upside down, plus leveling the hotbed. We still didn't get the expected result. And we speculate that some stress may cause the problems.
The following test results which all by Beagle Camera for your reference.
Struggle 1: Optimal temperature and withdrawal parameters
Struggle 2: Different Printers
We thought we solved the problem, but we ran into the Kobra Max, and the same parameters rendered even worse on this printer. After repeated failures, we realized the difference between the Kobra Max and the Ender 3.
One difference is the extruder, both of which are Bowden extruders, but the Kobra Max is a double gear mesh. The second main difference should be the hot end of the volcano and the MK8. There are more molten filaments in the Volcano hot end, which supports faster printing (under-extrusion of filament is improved relative to MK8), but this worsens the stringing problem.
Struggle 3: Different Printing Filaments
The print quality problem caused by Kobra max time-lapse photography, we have not found the best print quality effect in adjusting the printing temperature and retraction parameters, so we began to study different consumables.
We used silver PLA from Prusa and ran a print test of the same file. We have to say that the drier the material, the less stringing. When we thought it was all over, we found that the model still had blobs, and zits issues
Struggle 4: Different Slicing Software
Review the process of taking pictures with time-lapse photography. The sprinkler will leave from the last coordinate of the current layer and return to that coordinate position after taking a photo.
Combined with what we all know, the components of printing a complete model are generally divided into the outer wall, filling, and inner wall. Then we found that Cura, Prusaslicer, Ideamaker, and other slicing software have different printing order settings, so we tested them in turn and got different results.
In conclusion
First of all, choose a dry high-quality printing filament. Such as Prusa PLA silver, good material may not allow you to get the best print quality directly, but it will make it easier for you to get a good print quality.
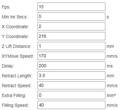
Secondly, get to know your printer nozzle, such as Bowden extruder or direct extruder, hot end type such as MK8, Volcano, E3D V6, Revo. For example, we tested the MK8 with a retraction of 3.5mm and a retraction speed of 40mm/s and achieved good print quality (at least the stringing problem has been solved, and you must have found some gaps if you are careful). The Bowden extruder at the hot end of the Volcano has a retraction of 7mm and a retraction speed of 45mm/s to obtain good print quality.
Finally, using the Ideamaker slicing software. We noticed that it has a good effect on the printing order (inner wall > outer wall > fill) for taking pictures, hiding some filaments inside the model, and solving some blobs, zits, etc.
For the latest V1.1.4 Beagle Camera firmware, it may be temporarily incompatible with M1001, M1002, M2000 commands. But you can block the above commands in the slicing software, click hereto get it.
Please note that the above recommendation about filament and slicing software does not mean that they are the best. Each filament and slicing software has its own strengths, here is just to show that we get a better printing result with above filament and slicing software print result.
You can find more time-lapse videos and information our website. Welcome to discuss with us and let 3d printing is more fun. If there's any question or need assistance from us, please feel free to contact us at support@mintion.net.
Clean Timelapse Video Reference Parameters
Creality Ender 3
Anycubic Kobra Max

Prusa i3 MK3S+
